Building with Smart Panels
Below are the steps you as a builder can follow to effectively put Smart Panel together.
Do you need a designer for your build? Please refer to our recommended designers, engineers and builders, or contact us.


Easy 10-Step Guide to Building with NZSIP Smart Panels
STEP 1– Equiment, Tool List and Fixings
Building supplied equipment and responsibilities
Staff
- 2-3 installation staff – one LBP certified building and 1 or 2 support staff
Tools
- 2 x Impact driver and / or Drills for fixing
- Two levels – long and short for straightening walls
- Worksafe ladders and movable scaffolding unit for installing headers
- Bracing timber for straightening and holding walls in place
- PUR Spray foam and foam gun
Key Tasks
- Review all plans and details as per the construction issue of engineers drawings, architects drawings and NZSIP panel plans
- Ensure bottom plate is installed as per engineers drawings before the panels arrive
- Book Tele-handler or Hi-Ab for devanning of panel pellets , for install of larger headers and roof installation
NZSIP Smart Panels components supplied to site
- Pre-ordered Smart wall, roof and floor panels in weatherproof packs
- Allen key x 2 for Cam locks
- Roof and wall panel corner fixing screws (with fixing heads)
- Top plate timber runs (includes roof raking angles)
- Lintels supplied as per the panel plan
- Air and weather tightness tapes
We will agree with the builder on preferred unpacking method for panel packs depending on the sites requirements.
Generally the panels will be delivered to site by truck and trailer or Hi-Ab for a stand sized home. We recommend Tele handler for unloading of panel packs.
NZSIP Smart Roof panels can be delivered to site at a later date to the Smart Walls in requirement with associated extra handling and transport fees.
STEP 2– Site Setup
- Smart Building system arrives on weatherproof clear wrapped pallets.
- You will need a clear space for panel delivery as close to the site as possible. Panels will be delivered by hi-ab or truck and trailer units with telehandler.
- Panels must be stored in an area that is not susceptible to flooding and off the ground.
- Site store panels must be kept dry and covered at all times until ready for use.
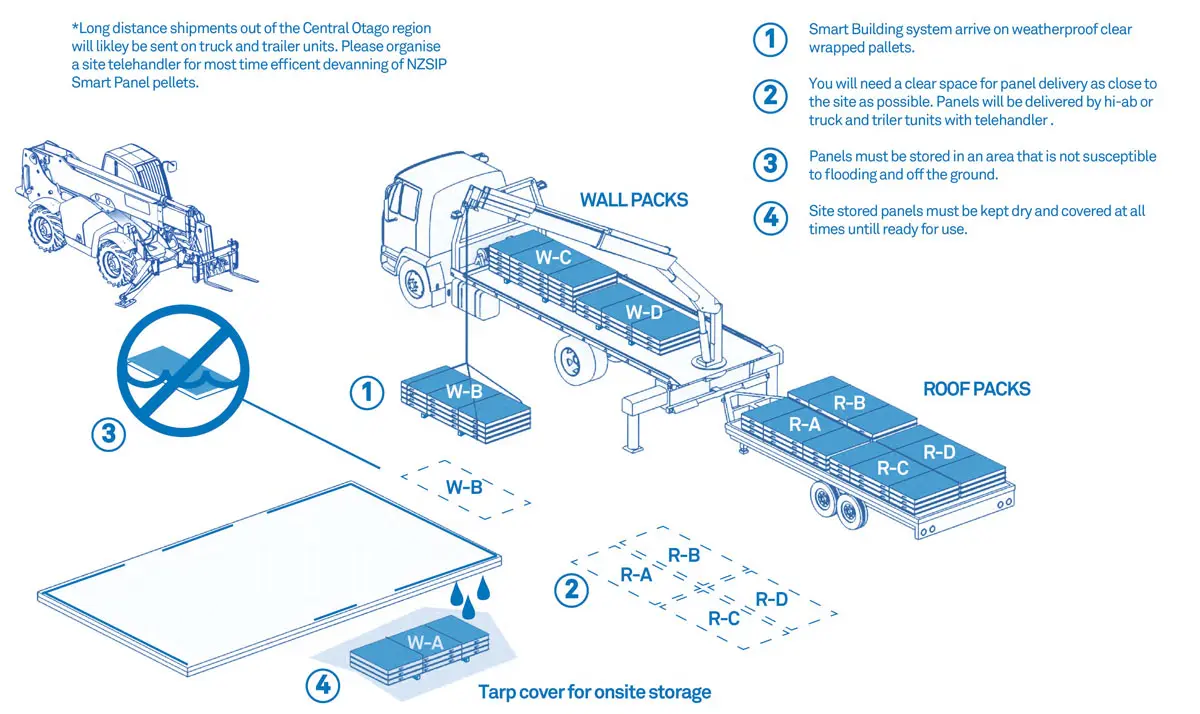
*Long-distance shipments out of the Central Otago region will likely be sent on truck and trailer units. Please organise a site telehandler for the most time-efficient devanning of NZSIP Smart Panel pallets.
STEP 3– Bottom Plate Set Up
- Precast or chemset hold down bolts into the concrete foundation perimeter or affix to pile floor system as per engineer and architects drawings. Please note fixings into pile floor system may differ – refer to engineers specification.
- Layout timber bottom plates to insure correct fixing positions. Drill holes for bolts. Fix provided plate lengths as per the bottom plate plan drawings. We recommend using bottom plate timber that is less susceptible to swelling.
- Ensure the bottom plate stays as dry as possible to avoid swelling for an easier fit of Smart Wall Panel. Staple plastic wrap provided over bottom plate to mittigate rain swelling.
- Make sure the foundation is clear of debris & dust that could affect air tight bond of the base plate with the foundation.
- Building control officer or engineer to inspect installed bottom plate prior to Smart Panel install.
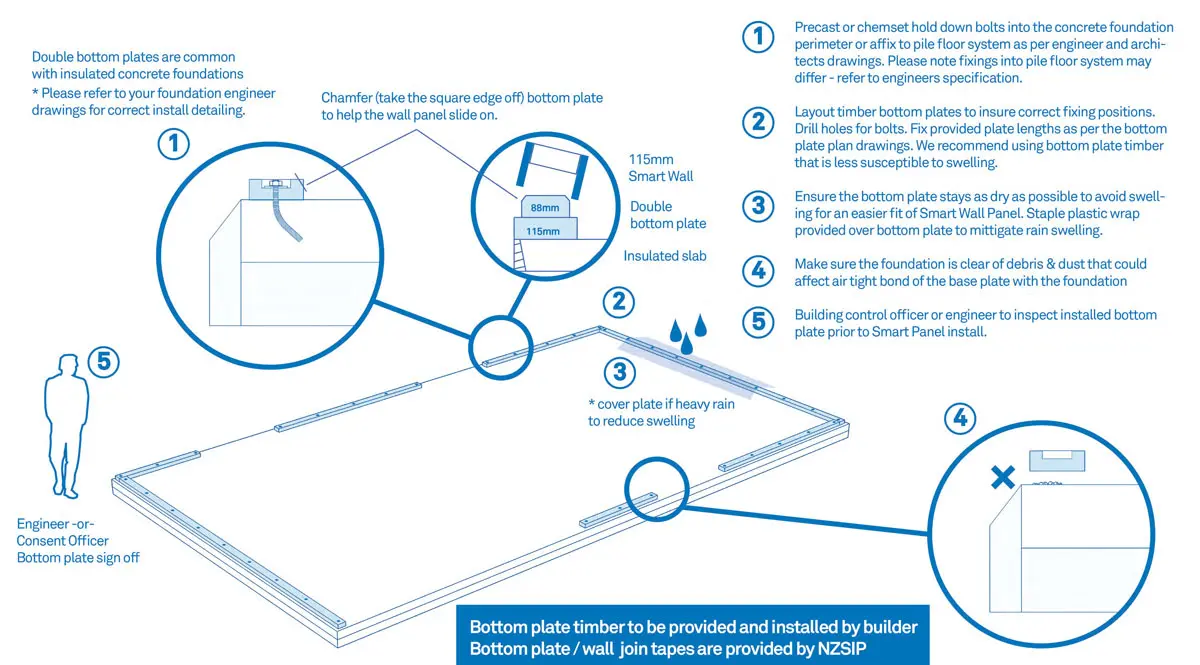
Double bottom plates are common with insulated concrete foundations.
*Please refer to your foundation engineer drawings for correct install detailing.
STEP 4– Smart Wall Set Up
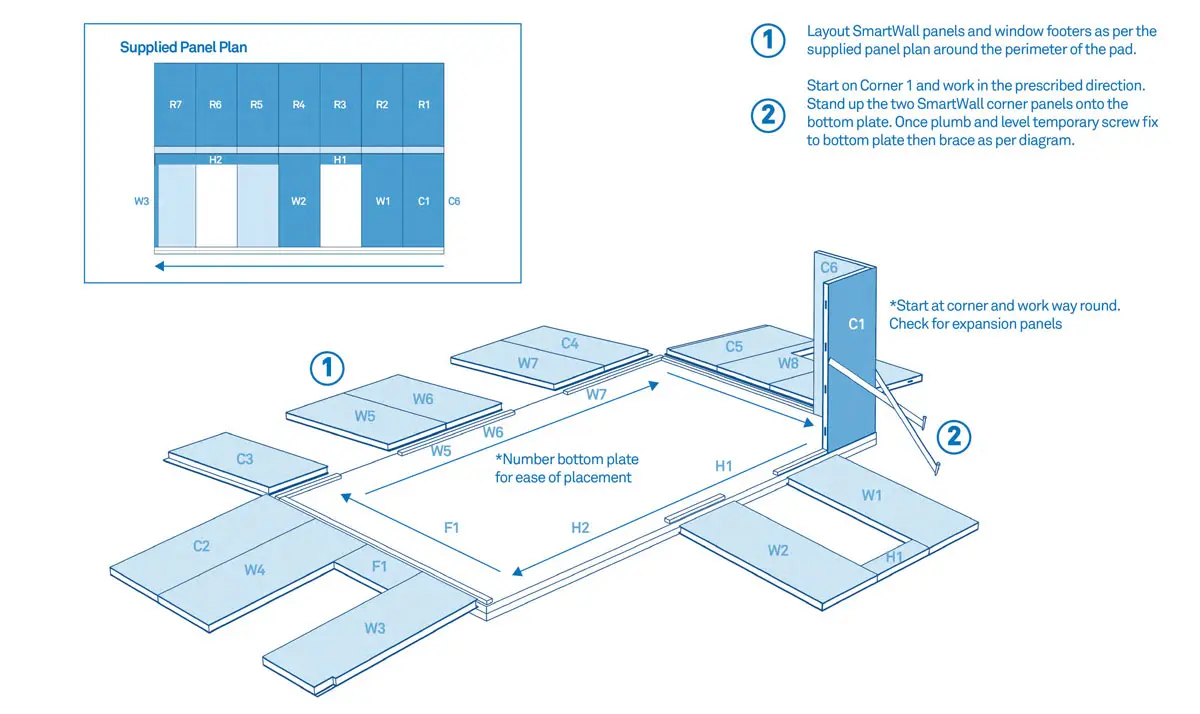
- Layout SmartWall panels and window footers as per the supplied panel plan around the perimeter of the pad.
- Start on Corner 1 and work in the prescribed direction. Stand up the two SmartWall corner panels onto the bottom plate. Once plumb and level temporary screw fix to bottom plate then brace as per diagram.
STEP 5– Construction of Walls
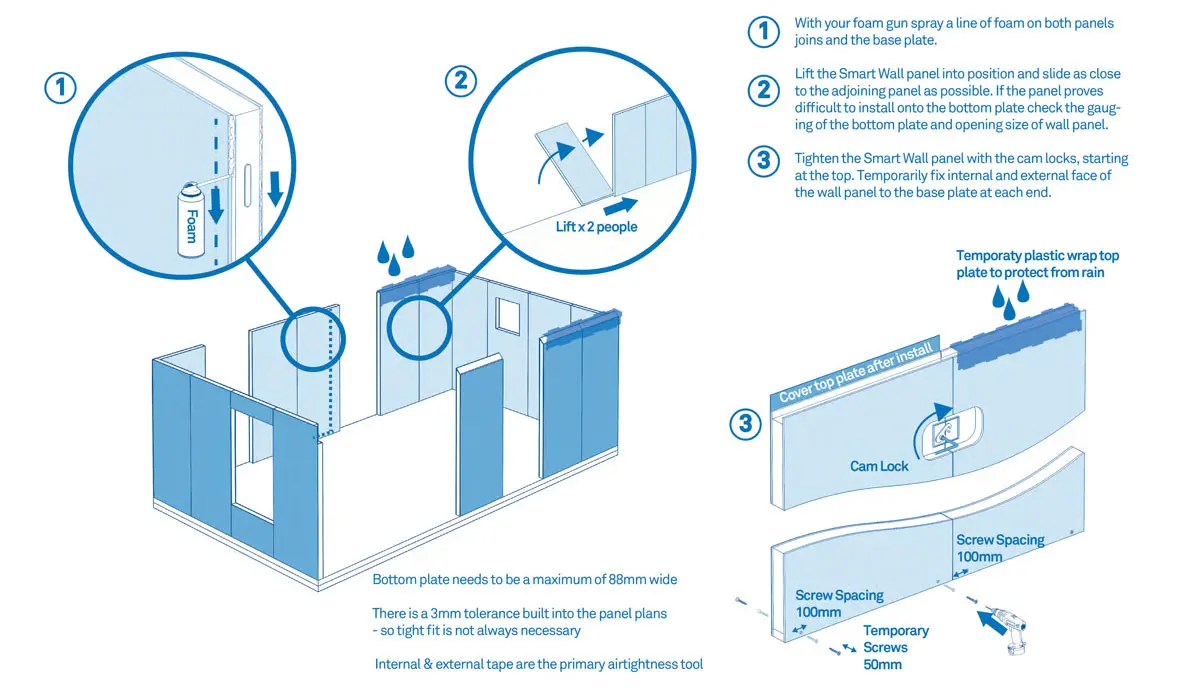
- With your foam gun spray a line of foam on both panels joins and the base plate.
- Lift the Smart Wall panel into position and slide as close to the adjoining panel as possible. If the panel proves difficult to install onto the bottom plate check the gauging of the bottom plate and opening size of wall panel.
- Tighten the Smart Wall panel with the cam locks, starting at the top.Temporarily fix internal and external face of the wall panel to the base plate at each end.
- Check the panels are true & level and repeat until wall section is complete. Brace panels as where builder see fit and for weather conditions like high winds.
- NZSIP Smart Wall Panels come with an adjustment panel per long wall length. This can help manage any unforeseen minor variation in pad/foundation and bottom plate lengths during construction.
- When constructing openings that have headers and footers, ensure the footer panel is installed and temporarily fixed to both adjacent Smart Wall panels first. Then slide the header into position ensuring plumb and level.
*Note for large openings it is recommended you brace either side of the long header until the Smart Wall system is completely fixed off to avoid movement.

STEP 6– Top Plate and Wall Bracing and Fixing
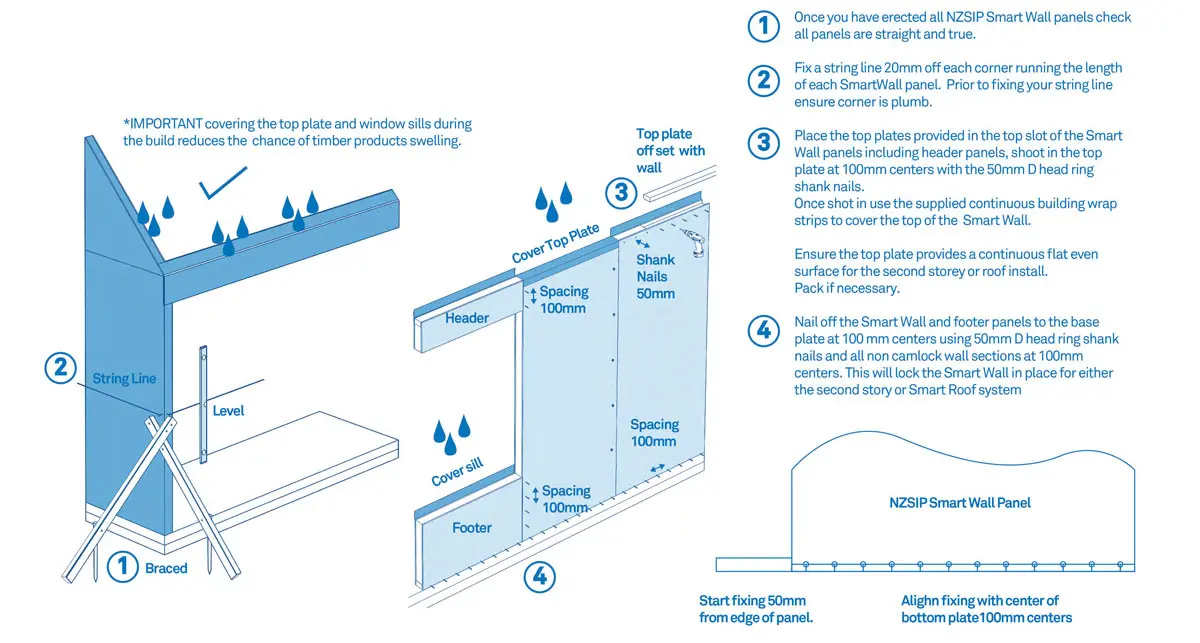
- Once you have erected all NZSIP Smart Wall panels check all panels are straight and true.
- Fix a string line 20mm off each corner running the length of each SmartWall panel. Prior to fixing your string line ensure corner is plumb.
- Place the top plates provided in the top slot of the Smart Wall panels including header panels, shoot in the top plate at 100mm centers with the 50mm D head ring shank nails.
Once shot in use the supplied continuous building wrap strips to cover the top of the Smart Wall.
Ensure the top plate provides a continuous flat even surface for the second storey or roof install.
Pack if necessary. - Nail off the Smart Wall and footer panels to the base plate at 100 mm centers using 50mm D head ring shank nails and all non cam lock wall sections at 100mm centers. This will lock the Smart Wall in place for either the second story or Smart Roof system
STEP 7– Second Story (if applicable) and Gables
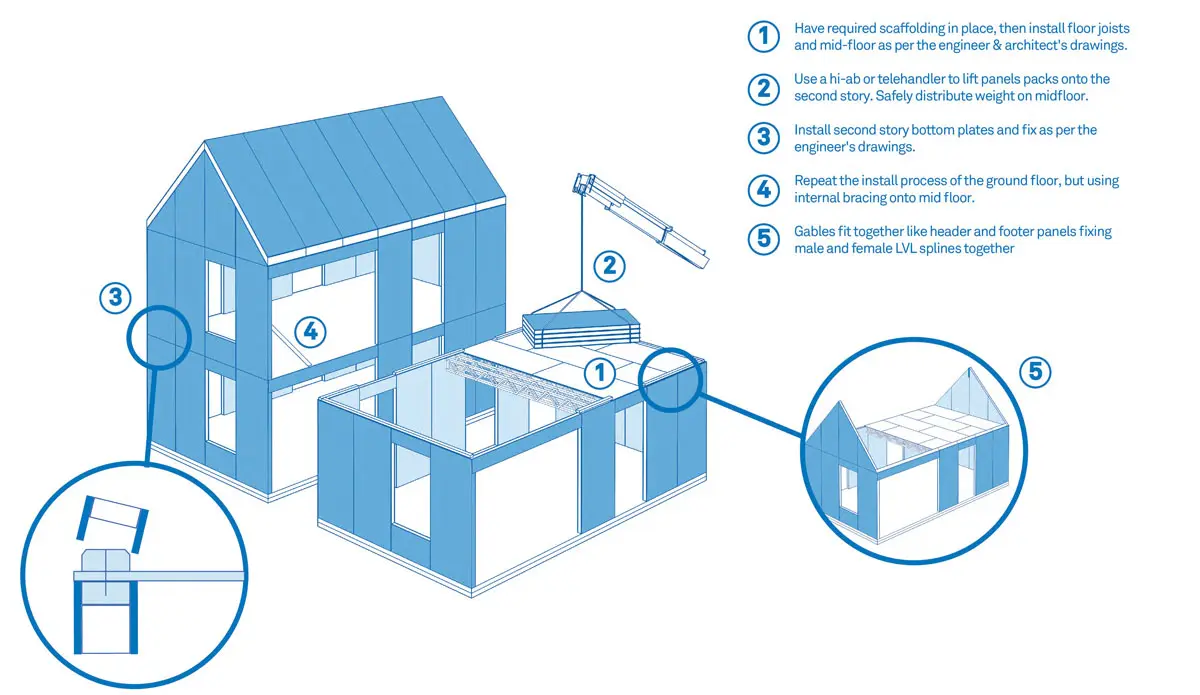
- Have required scaffolding in place, then install floor joists and mid-floor as per the engineer and architect’s drawings.
- Use a hi-ab or telehandler to lift panels packs onto the second story. Safely distribute weight on midfloor.
- Install second story bottom plates and fix as per the engineer’s drawings.
- Repeat the install process of the ground floor, but using internal bracing onto mid floor.
- Gables fit together like header and footer panels fixing male and female LVL splines together
STEP 8– Roof Preparation
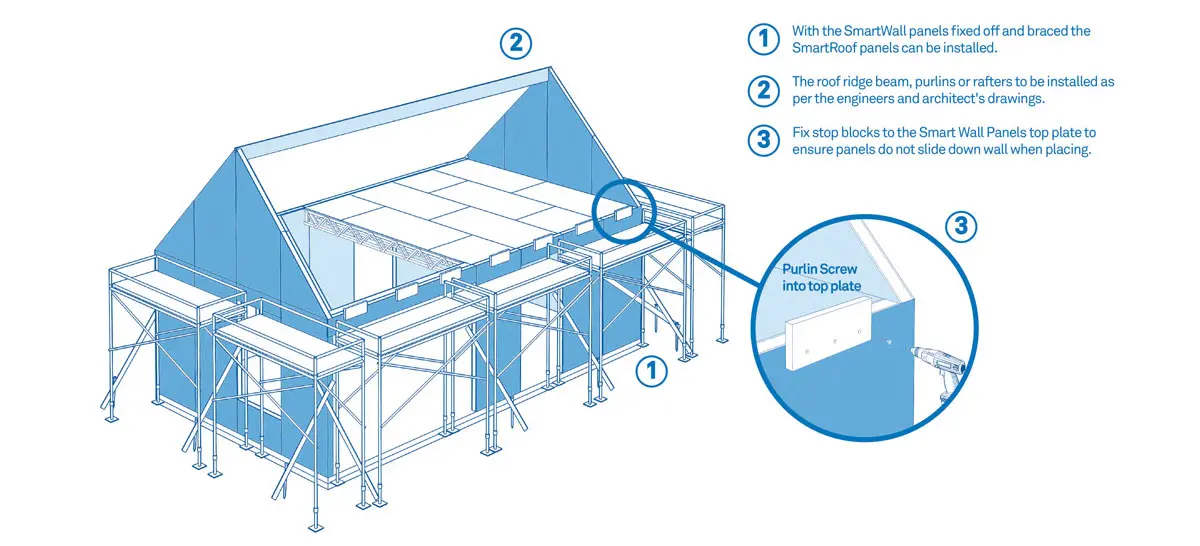
- With the SmartWall panels fixed off and braced the Smart Roof panels can be installed.
- The roof ridge beam, purlins or rafters to be installed as per the engineers and architect’s drawings.
- Fix stop blocks to the Smart Wall Panels top plate to ensure panels do not slide down wall when placing.
STEP 9– Roof Install
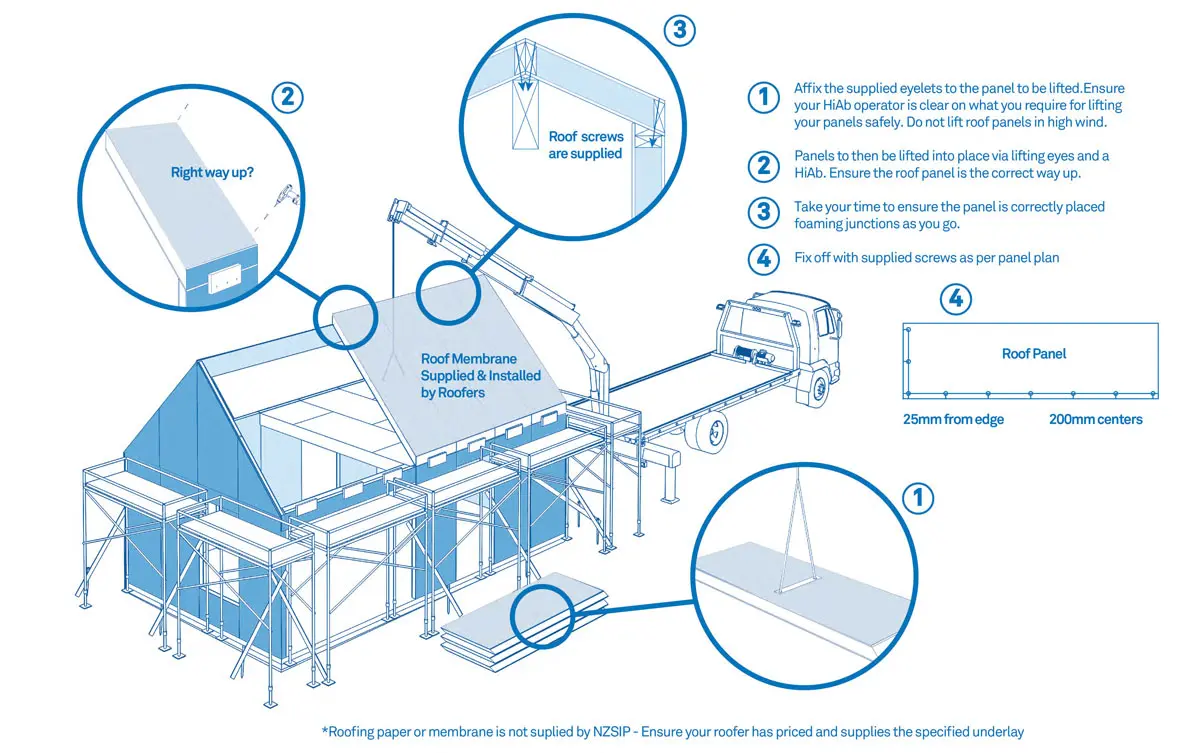
- Affix the supplied eyelets to the panel to be lifted.Ensure your HiAb operator is clear on what you require for lifting your panels safely. Do not lift roof panels in high wind.
- Panels to then be lifted into place via lifting eyes and a HiAb. Ensure the roof panel is the correct way up.
- Take your time to ensure the panel is correctly placed foamingjunctions as you go.
- Fix off with supplied screws as per panel plan
STEP 10– Weathertightness and Warranty
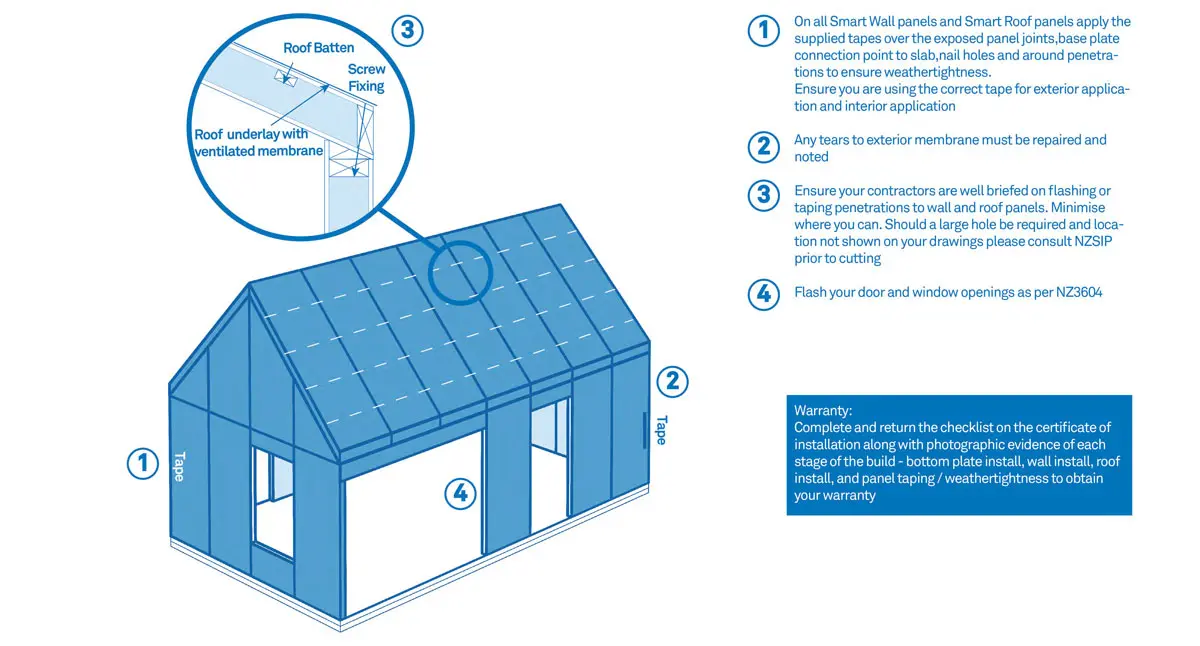
- On all Smart Wall panels and Smart Roof panels apply the supplied tapes over the exposed paneljoints,base plate connection point to slab,nail holes and around penetrations to ensure weathertightness.Ensure you are using the correct tape for exterior application and interior application.
- Any tears to exterior membrane must be repaired and noted.
- Ensure your contractors are well briefed on flashing or taping penetrations to wall and roof panels. Minimise where you can. Should a large hole be required and location not shown on your drawings please consult NZSIP prior to cutting.
- Flash your door and window openings as per NZ3604.
Warranty: Complete and return the checklist on the certificate of installation along with photographic evidence of each stage of the build – bottom plate install, wall install, roof install, and panel taping/ weathertightness to obtain your warranty

NZSIP is proud of our affiliations…


New Zealand Structural Insulated Panels (NZSIP) Limited
5 Wolter Cres, Cromwell, Central Otago
p: 0800 2 NZSIP e: [email protected]